I assume this Kimsnot card is meant to be a fake Kingston SD card, although it appears to steal more of the visual design from a SanDisk Extreme card. This SD card was sadly used to photograph a wedding, and unsurprisingly to us, only the first 16GB of photographs are readable. The rest are lost forever, because the other 112GB just doesn’t exist. The card reports 128GB of useable space, but anything above 16GB gets written into thin air. You don’t even get an error until you try to read back the files later. We’ve seen all sorts of fake capacity storage, and despite clearing them out every once in a while, Amazon and eBay are back selling them again. And just in time for all the new cameras, phones, and computers people will be getting for Christmas!
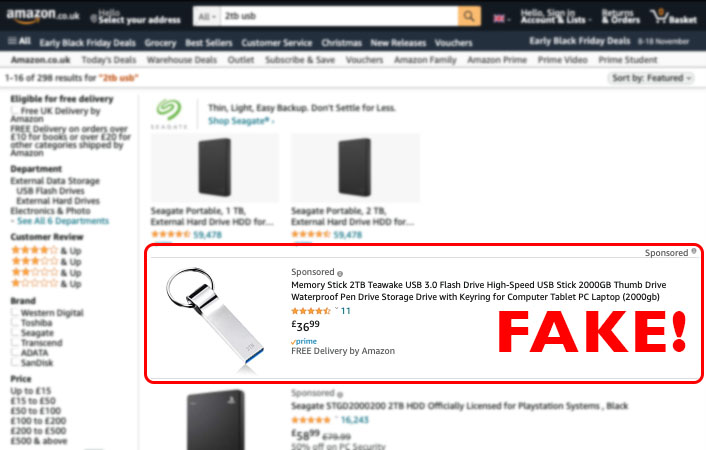
Fakes are usually sponsored listings, so look for the sponsored tag.
Fakes are usually cheaper than everything else, but not always
Fakes can be brands you’ve never heard of. Making storage devices is expensive business, so you’ve probably heard of the genuine companies.
Spelling or specification mistakes.
Buy from trusted sellers only. You’re less likely to buy a fake card from Argos, John Lewis, Currys, or even a supermarket!
The fakes usually work to a point, but with worse performance, and not to the full capacity. Try to fully test the device across the whole storage before you trust it. Fakes commonly have 32GB or less real storage, so make sure to test writing & reading above that size.
How bad is it?
I’ve just this second run a few searches, and get fake products as the first result. In the case of ebay, it’s the top result of 1,522, and appears directly above a genuine hard drive.
eBay Fake 1TB Portable DrivesAmazon Fake 2TB USB Drives
It’s been a longtimesince I’ve written about iPods on this blog. 2008 was the last post I could find.
In that time, SD cards have become so cheap they’re almost disposable, and iPods have virtually disappeared from normal life. But I still have one, and I still love it. I built this FrankenPod about ten years ago from a pile of broken iPods so it’s always looked a mess. The back cover came from an 80GB iPod Classic, an 80GB hard drive from a MacBook Air, and all the other internal parts were scavenged from various broken iPods. The plastic screen was already covered in scratches, so I never felt too bad about stuffing it into a pocket with coins or other junk. Not my usual style!
Upgrade Time
The battery had started to show its age so I set about replacing it. I assume parts will eventually start getting hard to find, but eBay is still full of spares for now.
I had to dismantle the iPod to replace the battery anyway, so I had a look at the other parts to see what else I could fix up. Then I remembered the iFlash adapter. I’d previously used a similar adapter to add a Compact Flash card to an iPod 4G, so I checked to see if there was an updated ZIF adapter. There sure is! And better yet, it works with super cheap, fairly fast SD cards. Add that to the parts list.
Fortunately, the scratched exterior screen on this iPod has protected the delicate LCD screen inside, which is still in perfect condition. The Clickwheel™️, headphone port, and dock connector are all in good enough condition to keep.
My original plan for the front case of the iPod was to strip it down to bare metal and then prime and repaint it. I wanted something unique so thought I’d end up going for a bright yellow or chrome effect paint.
Enter The Rat 🐀
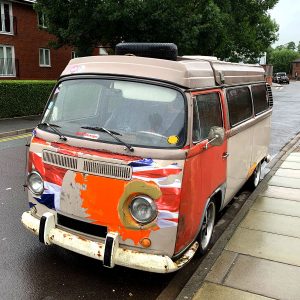
Scruffy Rat VW Bus
I started sanding the surface and realised how tough the anodised metal is. How it got so scratched up is a genuine mystery. I think this thing would survive a nuclear war. I went to work with sanding disks, grinding wheels and all sorts of abrasives and barely got through the top layer. As I was sanding, I started to like the way the iPod looked. My new idea was a RatPod. In the style of rat bikes, I would leave the outer surface looking messed up, but upgrade the internal parts. I couldn’t bear looking through the scratched screen though so still went for a replacement on that. I finished sanding the rough bits off, and making the surface silky smooth. The way all the edges are outlined by bare shiny aluminium looks pretty cool 😎.
iFlash
I chose the iFlash Solo for this project. This lets me swap the hard drive for a cheap SD card. My iTunes Library is only around 35GB so a single 64GB SD card will give me plenty of space for the future. (iFlash also sell adapters that take mSATA SSDs, or multiple SD cards for up to 1TB of music.) They ran a test a few years back about different storage options and found that microSD cards are pretty hard to beat for cost & power consumption, at the loss of a tiny amount of speed. They’re still way quicker than the old HDD, so that’s what I went with. The iFlash Solo has a full size SD slot, so I used the micro adapter that came with the Sandisk card.
Restore
While waiting for the screen glass to be delivered from China, I decided to connect all the other new parts and test the iFlash adapter. With everything loosely assembled I plugged in the USB cable, launched iTunes, clicked “Restore” and then…
The iPod could not be restored. An unknown error occurred (1394). ⚠️
Uh oh ☹️. I clicked “More Information” and expected the usual generic message. Instead I actually got a clue. It said the restore may fail if the battery is too flat. I can’t help but wonder how long this battery had sat in a box before I bought it. Anyway, I waited impatiently until the iPod was fully charged and then boom! iPod restored without issues. I loaded up some music and gave it a play. It works fine, and nice and quick.
The Finished Article
The finished iPod Classic.
I’ve only had this finished for about a week, but already there are a few things to note:
Starts playing music almost instantly
Feels really lightweight
Now shockproof
Perfect in the car
With the new battery, this thing lasts forever!
I was worried about support in macOS Catalina, but it’s OK
Update After a Week of Use
I had a few teething troubles with the iPod that didn’t appear immediately. After a few days working fine, I started getting intermittent skipped songs, or the iPod would just stop playing in the middle of an album. If left in this state, the iPod would eventually run out of battery and then need to be plugged in to bring back to life.
HFS+ What?
As I was using this iPod with my Mac, it gets reformatted to HFS+ during a restore. Information about MacPods is hard to find, but often the Windows formatted iPods need to be reformatted a particular way to prevent issues. As an attempted workaround, I’m currently using the iPod formatted for Windows, to see if that sorts out the skipping problem. You can use Windows formatted iPods on Mac but not the other way around. I’ll see how it goes.
Update 2021
Despite working mostly OK, I still had some occasional freezes with this iPod. I decided to crack it open again and try a different brand of SD card. I got a Samsung EVO plus 64GB, and touch wood, it’s been fine since. I’ve since checked the compatibility chart on iFlash, and it does have reports of problems with the SanDisk card I used before.
I published a post back in 2016 highlighting the problem we were seeing with Sandforce controllers on single SSD drives. We have now also come across this PCIe 3.2TB SSD that uses a Marvel controller as well as Sandforce controllers to control banks of data chips. Like the others, this device has I/O errors which we believe is caused by the Sandforce controllers. This PCIe SSD device requires proprietary drivers for it to be recognised in the bios and OS, regardless of what platform it is run on. Although we can communicate with the device via an SSD Utility provided by Toshiba, there is no access to the user data.
I have good news for our customers, our developers have been working hard and have produced a solution to the firmware failures of this model hard drive. I posted a blog alerting our customers back in March 2015 when we started to see the problems arise. A solution was tested just before the end of last year and we now have a process that fixes these issues.
We also have firmware fixes and recovery solutions for other Seagate Hard Drives.
Despite some amount of publicity, the problem of fake capacity flash drives being sold online has still not gone away. Recently we did a bit of consumer investigation and bought a few to test. Surely after two or three years eBay will have sorted this problem out?
What Are Fake Capacity Flash Drives?
If you’ve not heard of these before, a fake capacity flash drive is simply a small low capacity flash drive pretending to have (much) more storage. The clever / devious part is that they may have only 16GB of real storage, but can appear to the computer as anything up to 2TB. You will be able to copy data to the device, but only the first 16GB may be readable later. Some devices constantly overwrite the same 16GB while other just dump the rest of the data into a black hole.
How Do I Know If My USB Drive is Fake?
There are not any strict rules, but you can start to build up a picture as you gather more information.
Price – These flash drives will be WAY cheaper than anything you can buy in a retail store. We just bought 512GB flash drives for £10 and 1TB drives for £15. Currently a 64GB SD card is £32.48 at Novatech, so you can see how expensive real flash drives should be.
Quality – Large capacity USB drives are relatively expensive. You’d expect them to be well made and probably well packaged. The fake drives usually come unbranded, in generic clear bags.
Wording – Since these problems have been reported, some sellers are putting some disclaimers on the listings to suggest you should only use the devices for small amounts of data etc. This is obviously nonsense. If you buy a real 1TB of storage, you can use all 1TB.
Testing – Although most people won’t be familiar with testing hardware, there are some pretty simple tools to test USB drives. They write patterns of data to the chosen device and then read it back again to make sure it was written correctly. (I won’t provide a link as it would destroy any chance of recovery if used incorrectly!)
What To Do If You Have A Fake Capacity Flash Drive
Most online marketplaces like eBay have pretty robust buyer protection to allow you to claim a refund. The advice for making claims varies with each website so you may need to hunt around, or contact the site directly. Although eBay are more than happy to organise refunds, they show little interest in stopping the sale of these devices. We’ve spoken to eBay customer services a number of times and they said that their system will flag up if enough people make returns.
You Often Don’t Know Until It’s Too Late
It’s a bad idea to keep using one of these USBs. If you detect a fake capacity, you may think it’s OK to just use it for small amounts of data but it’s not a good idea. The problem is that as you use and delete files, you could gradually start edging towards the limit of the storage. The next file you write could just go into the black hole, and the data is lost. In fact, many people don’t realise their flash drive is a fake until they exceed the “genuine” part of the storage. If you were copying photographs to the USB drive, you might not notice that some of them are missing until you try to read them again much later.
Not Just Memory Sticks
These same types of fake flash drives also appear as SD cards so we’ve heard from people that were at weddings or on their honeymoon and lost all or most of the photos.
Update 31-10-2016: Since posting this, we were made aware of this report from the USA about eBay’s problem with fake flash storage.
For the last few years, newer editions of Windows have the ability to encrypt the whole disk with bitlocker. This means far more users are experimenting with encryption. We have seen an increase in recoveries from drives secured with bitlocker.
Is Data Recoverable From Bitlocker Drives?
In many cases the data is recoverable. It is important that we get the recovery key or password, as bitlocker security has not been compromised.
Common Issues
The most common problems we see with bitlocker encrypted drives are when the disk starts to fail, or when Windows becomes corrupt. This can prevent the built-in decryption process from working correctly and leave users locked out of their data. These drives can fail like any other, but the encryption adds an extra layer of complexity to the recovery process.
Solutions
If using bitlocker on your drive, it is important to keep a copy of the decryption keys in a safe secure place away from the computer. It is also extra important to keep a constant and regular backup process. Although recovery is usually possible from a failed bitlocker drive, it could take a number of days. You probably wouldn’t want to live without your files for that time.
If you have a failed bitlocker drive that needs recovery, (and if you have the recovery key) get in touch.
This hard drive is one of the new Hybrid drives that also uses flash memory for quicker access. It recognises frequently accessed data and stores this in the flash memory for faster read performance.
We have received these hard drives for recovery before and have had good success with rework ranging from firmware fixes to internal repair.
We received one of these hard drives just recently which had very limited access. It would show all of the hard drives details including Make, Model, Serial Number and Firmware, but it would not allow access to the user data.
Further diagnosis revealed a problem with the firmware. Even with our specialist hardware we could not overcome the problem. This drive has been designated for R&D, to try and understand this problem, and create a solution for it in the future.
My main computer is an old MacBook Pro. I often download Linux ISOs to install on other computers. In recent Debian-esque releases this is actually really simple.
1. I find it quicker and easier to install from USB so first insert a USB pen / stick of some sort.
Note: This USB stick will be erased, so don’t use one with data that you need to keep!
2. Next we need to find out which number has been assigned to the USB stick. If you only have one disk in your Mac then the USB will usually be disk1, but always check first. (Note: Disks are numbered from zero, so your internal drive should be disk0) On your Mac open Disk Utility, which is located within Applications / Utilities. (See Image)
Disk Utility
Select the USB stick from the lefthand window and then click the Info button which is on the toolbar. (See Image)
USB Info
You will get a pop up window with loads of information about the device. We only need the Disk Identifier. Make a note of this for later.
Disk Identifier
3. To allow us to write data to the USB stick we need to unmount any volumes currently on there. (see image)
Unmount USB
4. Now comes the actual writing. First locate the Terminal application, again within Applications / Utilities. (see image)
Mac Terminal
5. Remember to change the code to match your Disk Identifier from earlier. There are a few things to note about the following command.
sudo – allows you to run dangerous commands, so will require an administrator password
Instead of typing the location of the ISO file you can just drag the ISO onto the terminal when required.
“if” means input file (in this case the ISO file), “of” means output file (the USB stick)
When we found out the Disk Identifier, it was disk1. That will work in the command, but we use rdisk1 instead, which gives us raw access to the disk. This may not be necessary, but it works for me.
There is a lot of discussion about block sizes, but I find 4MB is reasonable for writing ISOs to USB. In Linux we often type bs=4M, however the Mac prefers it like bs=4096 instead. It’s the same thing, just expressed differently.
The command:
sudo dd if=[drag iso here] of=/dev/r[disk number] bs=4096; sync
If you’ve got it right, you shouldn’t get any feedback until it finishes. Your USB stick may have a blinking LED whilst the data is being written. For reference the 200MB debian-netinst ISO took just over a minute to write.
Once complete you should get something like:
48896+0 records in
48896+0 records out
200278016 bytes transferred in 95.151719 secs (2104828 bytes/sec)
This means you’re finished. Now eject the USB and try to boot your PC with it. The Mac may complain that the disk is not readable but just ignore that and try it on a PC.
We have just received an 8GB USB pen with a broken connector. The customer started phoning around and was shocked by the costs he was given. He then called us and was pleased to hear that we only charged £89 if the work was successful. This includes dismantling and repair of the USB Pen even when it appeared to be beyond repair.
TDK reckons it can use lasers to double hard drive density by heating platters and HP / Hynix want to take on flash memory with it’s Memristor technology.
It makes a change to see two storage technology articles on general tech blogs in one day.