Category: In Depth

This is the section for our longform, long reads & detailed articles. Usually (but not strictly) on a single subject, and longer than 400 words.

  • Unknown Windows 98 Backup CDRs from 2002

    We don’t often get much call to recover CDs anymore, but this recent case was interesting. We received a set of five CDRs labelled image library backup 2002. The user had no idea what software created them, and just a vague memory that they may have been burned from a Windows 98 PC.

    Step 1… Read the discs

    As usual, our first task is to read all the discs, and in this case save them to image files (ISO / Bin Files) for scanning later. Due to their age (19 years!), I expected this to be the hard part, but all the discs read well. Good work pink Verbatim DataLifePlus®! In fact there were just six unreadable sectors near the end of the final disc. This seemed like a good point to begin the next phase, and actually see what files I could get from them.

    Where the problems start

    Mounting the disc images, just showed a single, (un)helpful file.

    Backup CD. This is a backup CD. Except for this file the contents of this disc must be accessed using your backup software

    Readme.txt (2002)

    The reason for such a vague message became clear later. The companies behind this software went through a number of years where they were sold, resold, sold again, rebranded, you name it. I suppose the generic message saved them having to update the code for every different version of the software.

    Hex editing

    I had a bit of a poke around inside the image files, to look for clues. Aside from the text above, the vast majority of the discs looked like compressed data. This is bad news if you don’t know what compressed them! There were a few little nuggets of metadata, and a few promising repeating strings. These strings lead me to this page. There were some similarities between my disc images, and the example headers from Will’s Zip Disk images. I tried the tools provided by Will, but couldn’t get them to work with my files. I contacted Will to see if he had any ideas, and he was extremely helpful and interested in the project.

    The old web

    In 2002, it was far more likely that you got your software on floppy disks or CDs, and your tech information from a paper magazine. Anything that was written online back then, has largely fallen into digital disrepair, or disappeared altogether. I’ve never seen so many 404 error pages than when I was trying to research these backup discs.

    Think Different™

    I’d seen a screenshot of a similar looking readme file, and that post mentioned Backup Exec. I’d heard of Backup Exec as a more recent tool for servers, but didn’t realise it started out as a simple tool to backup Windows PCs to removable media. After trawling though pages of dead links, I eventually found a couple of old versions of backup exec on archive.org. There was even a version named “Seagate Backup Exec for CD-R, Version 5.4” from 1996. It all started to seem so easy.

    Spin up the VM

    I booted a Windows 98 Virtual Machine, and installed the Seagate version of Backup Exec for CD-R. After a required reboot, the VM failed to boot, so something was incompatible. Old VMs like this can be temperamental, so I didn’t go any further trying to track down the fault.

    A problem shared

    I was speaking to a friend about this case, as he’d been a Backup Exec user more recently. He didn’t have any other suggestions for me, but after our chat, he sent me a couple of links he’d found. This one in particular mentioned another bit of trivia about the software companies. Apparently another company Stomp Inc once used the code from Backup Exec in a Windows tool called “Simple Backup.”

    Back to archive.org, and I found a copy of version 4.61. Had to be worth a try.

    veritas stomp simple backup main screen

    I installed this on the Windows 98 VM and rebooted… I half expected it to corrupt the VM again, but this time it booted up fine. Simple backup launched with a Veritas logo animation and then successfully read and restored the CDs. The job was complete. The software was even smart enough to cope with the couple of missing sectors on disc 5.

    In total, I extracted around 3.5GB of photos.

    Not over yet

    Although I’d successfully extracted the files from the backup, they were now trapped inside the Windows 98 VM. Usually VMs can communicate back to the host, but Windows 98 doesn’t easily work that way. To avoid messing around too much, I decided to just mount the virtual disk from Windows 98 to a Windows XP VM, which does have support for sharing files with the host. That got the data back out into the real world!
  • More Second Opinions

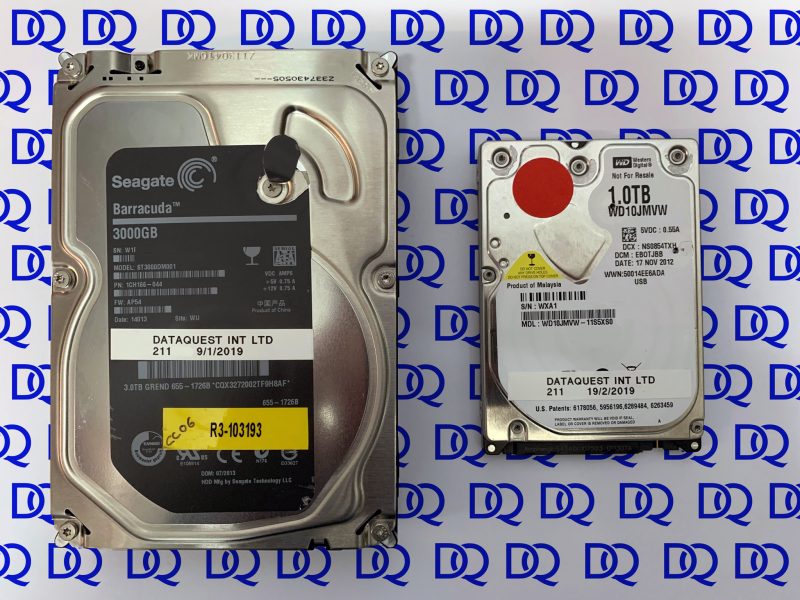
    We recently posted on Facebook about a pair of disks that we recovered. Both had been sent around the market a little bit, so I thought they’d be worth writing about in a bit more detail.

    We never like seeing open disks, unless we open them ourselves!

    Disk 1 – 3TB Seagate drive from an Apple Time Capsule.

    The disk had previously been sent to another lab for recovery. It was diagnosed as having multiple damaged heads, a stuck motor, cracked head-ramp, and microscopic damage to the disk surface.

    Our Findings

    We could see the screws and seals had been tampered with on the outside of the drive. When we took the drive into our cleanroom, we found sharpie pen markings on the various components. This usually indicates that parts had been removed or replaced. Of particular concern were the markings and screws around the spindle motor. With vertical and horizontal alignment, we never want to see a disk pack disturbed. We had no way to know if the disks had been rotated independently and had their alignment destroyed.

    Although we didn’t know about the disk pack, our only way forward was to install new heads and ramp, release the stuck motor, and see how the drive responded. On power-up, the drive failed to reach readiness and we were unable to access the diagnostic mode. One tiny sliver of hope was that when we rebuilt the donor heads back into their own drive they still worked fine. This at least told us there wasn’t significant disk damage.

    We installed a different set of heads, and this time were able to bring the disk ready using our diagnostic tools. We were able to extract a small amount of data before the heads stopped reading again. This time, we confirmed that disk damage had contaminated the new heads. This gets into awkward territory. The only way forward is to keep feeding new heads into the drive, resume the procedure, and keep extracting more data. In total we used three sets of fresh heads before we’d extracted all the files. We ended up with over 95% of the data recovered successfully.

    Disk 2 – 1TB Western Digital My Passport drive.

    This one was a bit different. The user had been given a good chance of recovery from another company, but been quoted over £1300 for the recovery. If you’ve been here before, you might know that we prefer to publish our prices online. You can see the costs before you even send a disk to us. The maximum price for a similar recovery with us was £488 but it was likely to be recovered for £329.

    By the time we received this disk it had been sent to a second other company. One with a bad track record that I won’t name. They quoted an impossibly low fee but after receiving the drive raised it until it was higher than ours!

    The more places that meddle with a disk, the lower chance we have of ever figuring out what the original fault was. In many cases we need to revert all the recovery attempts first, and then start from scratch.

    This disk again showed signs that it had been dismantled so we took it straight into the cleanroom to check the internal parts. There was no sign of damage, so we rebuilt the drive and proceeded with our usual diagnostic routine.

    We found a fault with the external electronic board on the drive so replaced it with a known good one. As with most modern disks, this also meant adapting the replacement board to work with our drive.

    The drive showed some instability during imaging, but it completed successfully and allowed full data access. Why the disk had been opened during the previous recovery attempts is a mystery. It served no purpose, and just introduced the chance of contamination and misalignment that was no help to the recovery.

    As expected, we ended up recovering the data for our lower fee.

    The Moral of the Story

    We always go the extra mile with a recovery. If you know anyone that’s had to give up on getting their data back, it’s worth sending them our way. We’ll never know how many more people have resigned themselves to never seeing their files again.

    Contact Us Now…

    For a fast reply from a real person.
  • Why Small Files Take Longer to Copy Than Large Files

    Have you ever noticed that it takes longer to copy 200MB of small text files than it does to copy a 200MB video file. This can seem a bit strange, but there is a simple reason for it.

    Metadata

    Every time you copy a file, the system must also copy over some metadata. Things like the filename, creation date, modification date, filesize etc. When you copy a large file like a video, this information is copied once, and then all the data blocks are copied into place. With tiny text files, new metadata needs to be transferred for each and every file.

    In real-world examples, I’ve seen disks capabale of copying at 100MB/s get as low as 1MB/s when copying small files.

    This is easier to see in simple animations. In the images below, the metadata is represented by the blue container and red block. The data blocks are shown in green.

    Copy Large Video Files
    Copy Large Video Files

    Copy Tiny Text Files
    Copy Tiny Text Files

    This behaviour also leads to one of the most annoying things about copying files. The crazy time estimates! If you copy a mix of large and small files, the computer can’t figure out how long the copy will take, so just adjusts the estimate as it goes along.

    Data Recovery Time Remaining

    This post assumes you’re copying the files in ideal conditions. In the real world you also need to account for slow networks, slow connections, failing disks and countless other things that can slow down a transfer.

    This is the first post in a mini-series about copying files.

    Read Part Two here about why computers always guess the wrong copy time.

    Read Part Three here about copying a failed disk

  • Fake Seagate Samsung Hitachi Drive

    Over the past decade, hard drive companies have been endlessly bought-out and then re-sold. At this point I’ve pretty much lost track of who manufactures which brands now. Since all this restructuring, it’s quite common to see portable Seagate branded drives with Samsung disks inside & vice versa. There are also Maxtor branded versions of those same drives in some markets.

    Fake Seagate Samsung Hitachi HDD
    Seagate Samsung HDD. Seems legit.

    So what’s wrong with this disk?

    Here’s a list of some of the problems with this disk:

    • Unfinished labelling (the white edges are usually peeled off)
    • Mismatched serial numbers
    • Wrong PCB for a Seagate / Samsung disk
    • Wrong capacity
    • Misspelled Regulatory as Reaularory (see image below)
    European Reaularory Address
    European Reaularory Address

    I’ve never seen a disk quite like this. It’s from a Samsung external case with a Samsung logo on the front label. It also uses a Seagate model number ST1000LM024. Normal enough so far, however the label shows one serial number while the label opposite the SATA connector shows a different one. Also a third different serial number is reported electronically to the system when the disk is attached.

    Hitachi Edge Code Serial Number
    Hitachi Edge Code Serial Number

    The label at the end of the disk is actually a clue to the true identity of this disk. It features the familiar Hitachi / IBM style with two separate stickers & barcodes. The disk is actually a Hitachi HTS5432L9 which suggests a much older 320GB disk that was likely destined for the scrapheap in a former life. Funnily enough, these Hitachi disks had their own strange history of mislabelling.

    Fake?

    I originally thought this disk may have been a white-label or grey market disk. Some disks get refurbished and are then sold under different brand names in other markets. After a bit more investigation I think it may actually be more sinister than that. This is more like a fake or fraudulent disk, designed to dupe somebody into thinking it is a larger disk than it really is. It appears to the computer as 1TB however only contains 320GB of usable space. This is very similar to the fake flash drives we’ve seen before. The problem with fake capacity disks is that when you exceed the genuine size, the rest of the data usually becomes inaccessible. Also depending on how the disk handles the problem, it could damage the existing data when it fails.

    Recovery

    Fortunately for the owner of this disk, they had not yet used up 320GB of the disk. In fact this disk failed when the USB connector fell off. Maybe another sign of the poor build-quality of this fake. Once we figured out what we were working with we were able to recover all data. It took a combination of Hitachi firmware repair, careful imaging, and then exFAT reconstruction.

    Fake Seagate Samsung Hitachi

    Contact Us Now…

    For a fast reply from a real person.
  • Fusion Drive Data Recovery

    Fusion Drive Data Recovery

    Urgent Warning: Fusion Drive always consists of two separate disks. If you want your data back you must get both parts. We’ve heard a number of reports that users with failed Fusion Drives are only given the Hard Disk back when receiving Apple repairs. On its own, the hard drive is not enough to recover all data in original condition. This is especially true if FileVault encryption is used.

    HDD + SSD = Fusion Drive
    HDD + SSD = Fusion Drive.

    What is Fusion Drive?

    Fusion Drive is Apple’s version of a hybrid solid state & mechanical disk. It combines a small fast SSD with a large slow hard drive to achieve a balance between cost & performance. Frequently used files are moved to the SSD, and old stale data is sent to the slow hard drive. This is all taken care of automatically behind the scenes. Unless you dig into the terminal, you wouldn’t even know you had two separate disks inside the Mac. Fusion Drive is  part of Apple’s Core Storage system. It is somewhat similar to Linux LVM as a volume management system.

    What Fusion Drive is not

    Fusion Drive does not use the SSD as a cache for files but actually moves data from one disk to the other. This is important, as both disks are required for full recovery.

    Why does Fusion Drive exist?

    At launch, and even now, the cost for large capacity SSDs is way higher than the cost of an equivalent hard drive. The problem is that SSDs offer huge benefits to the user experience. When you use an SSD, you hardly ever have to wait for things to load. The computer boots up within seconds.

    Hybrid drives aim to bridge the gap between solid state and mechanical disks. An iMac with a 3TB Fusion Drive comes with some of the benefits of SSDs, but much less cost. As the cost of SSDs fall, the need for Fusion Drive will eventually disappear. Apple has shown with their current lineup that they’d much rather go all-SSD where possible. Current iMac Pro & MacBook Pro both use 100% SSD internal storage.

    Anecdote Corner

    We’ve had two recent cases where a user has brought a “Fusion Drive” to us for recovery, but actually only had the hard drive part. Apple had given the damaged hard drive back after replacement, but reused the SSD when creating a new Fusion Drive. This user only had a few GB of data so the Hard Drive hadn’t even been used yet. All the data was stored on the SSD which was now overwritten.

    The majority of Fusion Drives we’ve seen have a Seagate ST3000DM001 3TB hard drive combined with a 128GB blade SSD.

    If you need help with a Fusion Drive:

    Contact Us Now…

    For a fast reply from a real person.
  • First, Do No Harm

    First, Do No Harm

    The maxim “first, do no harm” is a great first rule for data recovery, and is at the heart of our whole approach. If you’ve lost data, it’s only natural to panic, but the safest thing to do is stop and get advice. It’s usually best to switch everything off, but there are rare times where you wouldn’t want to do that either.

    When you should switch off a failed disk

    If the drive has failed completely and you can’t access the data, definitely switch it off. If the disk is clicking, or making strange noises, switch it off. Certain types of hardware failure will get worse if you leave the drive powered on. If the heads have been damaged, they could scrape all the magnetic storage coating from the disk. When the heads are stuck on the disk, they can be wrenched off and take a chunk of disk with them.

    If you’ve accidentally deleted some files from a disk, switch it off. You might not realise but as your computer sits there idle, there are all sorts of processes, downloads, updates and other background tasks that will be writing to your disk. Also  a system task could attempt to repair the disk, or reset the computer and overwrite your files. All of these issues are avoided if the device is turned off. Your computer will happily reuse the space where your deleted files are, so once files are deleted it’s crucial to stop the computer accessing the disk. Once data is overwritten it really is gone for good despite what anyone tells you.

    If you have a cloud service setup, you should download the data using another computer & disk. Make sure you check the downloaded data thoroughly before writing it back to your original disk. If you write the cloud data straight back to your computer, you’ve lost any chance of getting more data back if there’s something missing.

    When you shouldn’t switch off a failed disk

    If the data shows up at some point, copy it straight off. Hard drives are complicated machines, but sometimes the stars align and give you one last chance to access the files. Make sure you have enough free space on another disk, and make a copy of your files while you still can. There is a chance that if you power the disk down it might never show up again. Don’t waste that chance!

    ⚠️ If you start copying files and the speed goes down, while the time remaining goes up, you should stop and get advice. The hard drive could thrash itself to pieces trying to read the files and make recovery much more difficult. You don’t want to leave the disk unattended during this process, as it could fail and need to be switched off.

    Contact Us Now…

    For a fast reply from a real person.
  • Backup Your Data. It’s Not As Tough As You Think

    Backup Your Data. It’s Not As Tough As You Think

    According to the latest Backblaze survey, 21% of people have never made a backup of their files. The figures show a gradual increase in backups since 2008, but there’s still at least one in five people 🙋‍♂️🤦‍♂️🤦‍♂️🤦‍♂️🤦‍♂️ that are risking total data loss. And more than half of the people surveyed had no recent backup.

    Fortunately technology has changed a lot in the last few years. There are a whole host of  companies that offer free cloud storage. Large capacity, fast, and cheap external disks have also made backups at home easier. Software improvements in macOS and Windows have made backups automatic, so there’s really no excuse these days. Don’t wait until it’s too late!

    A Quick Guide To Making Backups ?

    Identify the files you can’t live without. These might be a few spreadsheets, some word documents, your thesis, anything irreplaceable. These are the files you’d grab if there was a fire. Forget photos for now as I’ve tackled them separately below ⬇️. If these files are small text or office documents, use something like dropbox or google drive to keep them synchronised in the cloud. An added bonus is this data will also be available on your other devices like iPads, iPhones or other computers. These cloud hosts give away a small amount of storage for free, so you might as well use it!

    Photos deserve a bit of special attention here. Photos and videos are often the largest files for home-users, and will usually be well over the limits of free cloud storage. Fortunately both Apple’s iCloud and Google Photos can take care of them. Google Photos will take an unlimited number of photo uploads but limits the size of single files. The size limits are fair for most home users, especially if you just use a smartphone and not a fancy camera. Although not free, the price for extra iCloud storage is pretty reasonable too – £0.79 per month for 50GB at time of writing. If you are an iPhone user, the iCloud option has other benefits like device backups, data sharing with Macs, iCloud Keychain etc.

    Once you have one of these options set up, it’s a good idea to keep an eye on it for a while and make sure the files are being copied over. You can login to all of these services from a computer and have a look at the files stored on there.

    The Whole Hog™ Whole Hog

    Now you’ve sorted the important stuff, It’s probably worth going the whole hog and also making a local backup. Don’t worry, it’s not difficult, and once you’ve set it up, you hardly have to think about it again.

    Mac Users ?

    If you plug in a new hard drive, macOS will ask if you want to use it with Time Machine. BEWARE that this will usually ERASE the disk and DELETE any data that’s on it! If that’s what you’re trying to do, click YES! Time Machine will then make a backup of your whole Mac. The first backup can take hours to finish so try to leave the computer on until it’s done. Once it’s finished, Time Machine will make regular backups as long as the disk is plugged in. These smaller backups just copy over new changes so don’t take as long.

    Recent versions of Time Machine will happily make backups to multiple disks if you have them. You could keep another one in a safe or at work, and bring it back periodically to update itself. Time Machine will figure out where it left off, and fill in the gaps.

    If your Internal disk ever fails, you can use the Time Machine backups to restore everything, including Applications and settings. You can also recover single files at any point if you ever need to.

    Windows Users ?

    Windows 10 has an automatic backup process too. It’s a little buried inside the settings, but once it’s set you can (pretty much) forget about it. I find the fastest way is to click the “Start Orb” and type “backup” into the search box. You want to choose “Back up with File History”. This should take you into the File History page inside Settings. Click “Add a drive” and select your external drive. Windows will now keep extra copies of your data files on that disk. The default options will backup things like Photos and Documents, as long as you store them in the standard Windows folders (which you should always do anyway!).

    File history will only save your data files, so if the computer fails, you’ll need to get it up and running again before you can load the files back on. It’s worth checking if you have the original disks, or even seeing if you can create rescue disks. (It depends on your system). The “Backup & Restore (Windows 7)” program allows for a full system backup, but in my experience, this process is much more prone to errors, and also takes a long time to complete the backups.

  • eBay Fake Capacity USB Sticks

    Update: Read The 2021 Update Here!

    Despite some amount of publicity, the problem of fake capacity flash drives being sold online has still not gone away. Recently we did a bit of consumer investigation and bought a few to test. Surely after two or three years eBay will have sorted this problem out?

    eBay Fake Capacity USB Sticks

    What Are Fake Capacity Flash Drives?

    If you’ve not heard of these before, a fake capacity flash drive is simply a small low capacity flash drive pretending to have (much) more storage. The clever / devious part is that they may have only 16GB of real storage, but can appear to the computer as anything up to 2TB. You will be able to copy data to the device, but only the first 16GB may be readable later. Some devices constantly overwrite the same 16GB while other just dump the rest of the data into a black hole.

    How Do I Know If My USB Drive is Fake?

    There are not any strict rules, but you can start to build up a picture as you gather more information.

    1. Price – These flash drives will be WAY cheaper than anything you can buy in a retail store. We just bought 512GB flash drives for £10 and 1TB drives for £15. Currently a 64GB SD card is £32.48 at Novatech, so you can see how expensive real flash drives should be.
    2. Quality – Large capacity USB drives are relatively expensive. You’d expect them to be well made and probably well packaged. The fake drives usually come unbranded, in generic clear bags.
    3. Wording – Since these problems have been reported, some sellers are putting some disclaimers on the listings to suggest you should only use the devices for small amounts of data etc. This is obviously nonsense. If you buy a real 1TB of storage, you can use all 1TB.
    4. Testing – Although most people won’t be familiar with testing hardware, there are some pretty simple tools to test USB drives. They write patterns of data to the chosen device and then read it back again to make sure it was written correctly. (I won’t provide a link as it would destroy any chance of recovery if used incorrectly!)

    What To Do If You Have A Fake Capacity Flash Drive

    Most online marketplaces like eBay have pretty robust buyer protection to allow you to claim a refund. The advice for making claims varies with each website so you may need to hunt around, or contact the site directly. Although eBay are more than happy to organise refunds, they show little interest in stopping the sale of these devices. We’ve spoken to eBay customer services a number of times and they said that their system will flag up if enough people make returns.

    USB Stick

    You Often Don’t Know Until It’s Too Late

    It’s a bad idea to keep using one of these USBs. If you detect a fake capacity, you may think it’s OK to just use it for small amounts of data but it’s not a good idea. The problem is that as you use and delete files, you could gradually start edging towards the limit of the storage. The next file you write could just go into the black hole, and the data is lost. In fact, many people don’t realise their flash drive is a fake until they exceed the “genuine” part of the storage. If you were copying photographs to the USB drive, you might not notice that some of them are missing until you try to read them again much later.

    Not Just Memory Sticks

    These same types of fake flash drives also appear as SD cards so we’ve heard from people that were at weddings or on their honeymoon and lost all or most of the photos.

    Fake eBay USB Drive Animation

    Update 31-10-2016: Since posting this, we were made aware of this report from the USA about eBay’s problem with fake flash storage.

  • SandForce SSD Data Recovery Problems

    SandForce SSD Data Recovery Problems

    The low prices and high speed access of the Sandforce controller made it an appealing option for SSD manufacturers such as Toshiba, Intel, Kingston & OCX. But it soon became a problem for users when the SSD devices using these controllers started to fail in their computers after just six months of use. Usually it resulted in the device not being recognised by the computer bios, and not functioning at all.

    That was okay if you were happy to have it replaced under warranty by the manufacturer. The problem came when you wished to try and recover critical data that may have been stored on these SSD’s. The use of full hardware encryption on the controller and the device, meant that the data could not be recovered, even when using low level data chip removal.

    Fortunately today these controllers are not so popular, and as a result most mainstream manufacturers do not use them. But be aware that they can still be found in some non branded SSD’s.

  • Free Data Recovery

    Despite offering world-class data recovery from our workshop here in Portsmouth, we understand that sometimes, the data just doesn’t justify the cost of getting it recovered. If you’re going to go it alone and attempt a DIY recovery, we’ve got some handy tips to avoid making things worse. It might be a good idea to print this page to use as a reference. Also feel free to comment at the end of the post if you’d like any questions answered.

    Stop Using Your Hard Drive

    If you want to recover data, you can’t do it from the disk you want to recover from. When you boot up a computer it writes data to the hard drive. Even browsing the web or checking e-mails writes little cache files to the disk, potentially overwriting the files you want to recover.

    Set Up

    You ideally want to work from a different and reliable computer, have plenty of storage space for recovered files, and make sure everything is ready before you attach the faulty disk. You don’t always get a second chance with hard disks, so make sure you’re ready to grab the files if they appear.

    Now You See Them

    If you suddenly gain access to the files, copy them to another drive as soon as you can. The disk is unlikely to have repaired itself, so this might be the last chance to copy the data before if gives up completely. Take the most important files first. If the copy gets stuck, stop it straight away as the disk could be causing damage.

    Watch The Clock

    If you decide to try DIY recovery, keep a close eye on the time. If the estimated time keeps increasing it could be a sign of disk trouble. Failure to deal with that could cause the drive to fail completely, and beyond repair (even for us). As a guideline, it should take no longer than a few hours to copy a whole 1TB disk over USB 3.0. If your estimate says much more than that, or keeps going up in time, it could be the disk getting worse. Maybe try copying important files in small batches first. Data Recovery Time Remaining

    Priorities

    Your priority with a failed drive is either to make a copy of the disk, or copy off the files as soon as possible. Don’t try to scan, repair or fix any errors. A failed repair can completely damage your files beyond recovery. This means don’t ever use spinrite, diskwarrior, techtool, or any other diagnostic tool until after you’ve extracted the data. Some people report success with these tools, but it’s far safer to copy the data first, and run those tools later.

    Restore or Reinstall?

    Don’t re-install or restore the computer. At best it will overwrite some of the data. At worst it will overwrite all of the data and leave you with a factory-fresh (blank) version of Windows. If you’ve already done this, we can often get data back, but it won’t be as complete as a normal recovery.

    Brrrr It’s Cold in Here

    Never ever put a hard drive in the freezer. Although this trick is a common part of data recovery folklore, it is likely to do so much more damage than good. We have never used any type of freezing process for data recovery, and neither should you. Leaving your hard disk unplugged for a day is likely to be just as successful, and won’t risk contaminating the delicate disks and heads. Hard disks are not air-sealed so even if you put them in a sealed bag, they already have moist air inside them which can freeze and then cause condensation.

    Stop Hitting Yourself

    If you saw how delicate the inside of a hard disk was, you’d never consider hitting, tapping or knocking it. Even if you did manage to dislodge stuck heads, you’ll probably either rip them off, or take a chunk of the disk with it. There are careful ways to remove stuck heads, but they cannot be done at home.

    Keep it Together

    Never dismantle a hard drive. This is a case when the “no user serviceable parts” label really is true. Not only are disk internals extremely delicate, they have an air filter in the cover to stop particles getting inside the disk. If you remove the cover, all sorts of dust and lint can get in. Dust particles are bigger than the gap between heads & disks, so they can cause the heads to crash into the disks and scrape off the magnetic coating. Once the coating is gone, the data is gone.

    Good Luck

    If you decide to try DIY data recovery, good luck, and be careful. If you’d rather let us look at the disk instead, get in touch.