We recently received a Macbook Pro for data recovery. When we removed the broken hard drive and installed a new one for the customer, we noticed that the trackpad was not working correctly and would not click when pressed. We dismantled the Mac again and removed the battery which was underneath the trackpad. When the battery was removed we found that the underside of battery had blown and was pushing against the trackpad. We installed a new battery, recovered the customers data and now the mac is working fine.
This drive has a hardware problem that can’t be repaired. Back up as much of the data as possible and replace the disk. See an authorised Apple dealer for more information. S.M.A.R.T. Status : Failing
If you see the message above, your hard disk or SSD has started to fail and has reported faults to the Mac. If caught early enough, these disks can usually be recovered. You can try to copy important data to another disk but if the copy process gets stuck for a while, it’s safer to stop. If you leave a failing disk in that state it can deteriorate until the disk is ruined.
If the data is really important, and you’d rather not take the risk, you could have a look at our Mac Data Recovery Services. We have been dealing with these sorts of problems for years and have a developed a really safe way to get the data off in good condition.
Whatever you decide to do, don’t ignore this message. The broken disk cannot repair itself, and will only get worse. In many cases, the disk won’t even be readable by the time you see this warning.
It doesn’t matter if the disk is still inside your iMac or MacBook, we can remove it for you, and even replace the drive at the end of the recovery process if you want. Ask about our Mac Setup service if you are interested.
This year we have seen a fair number of these particular model hard drives with internal media damage caused by a head crash. These are 3.5″ hard drives from external cases such as Seagate Freeagent Go-Flex and Seagate Expansion Desktop. They are also used as internal hard drives in PCs running Windows 7 & 8 also used in Apple iMac’s running OSX.
It has been difficult to confirm whether the media damage seen has been caused by an impact such as a dropped drive or from general electronic failure. What we do know is that as soon as you hear one of these hard drives start to click, then if you have not already got a backup in place, backup your data immediately.
On an Apple Mac running OSX the first sign of a problem is usually a spinning beach ball resulting in slow access. On a PC running Windows 7 & 8, the signs of a hard drive problem are once again slow access and lack of movement from the mouse icon.
If you have a problem with a Seagate hard drive, have a look at our Seagate Data Recovery Services. If we catch it early enough we should be able to recover the data!
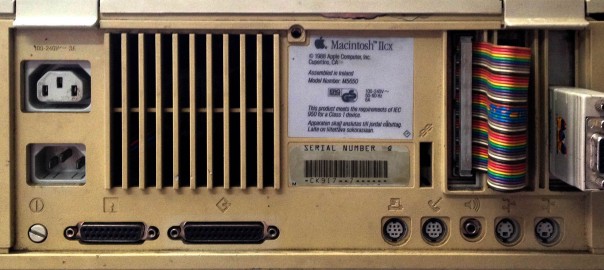
You may be surprised by some of the old computer hardware that’s still used by some companies today. Especially where they are used as the control interface for manufacturing purposes. We recently received a Quantum 40MB SCSI II hard drive from an old Macintosh IICX that was controlling a piece of 7 Ton Fabricating equipment. The software communicated to the CNC equipment through an internal Nubus card with SCSI interface. For the customer it was not just a case of getting the user data off the drive, but to get an exact image so they had a bootable drive with all the relevant software and drivers to run the CNC machine. With our experience in old computer hardware especially old Macs and DOS based PC’s we were able to recover the data from the hard drive and make a bootable replacement drive to get the customer back up and running. For the customer there was no other option but to get his old Macintosh IICX back up and running as new CNC equipment was too expensive.
Old Macintosh & DOS CNC Machines
Macintosh IIcx Bus Error
This is not the first time we have been involved in this sort of request and process. Back in 2008 we had a similar situation with a customer who had a CNC milling machine that was run by an old DOS PC with a Fujitsu M2682TAM hard drive. Again we managed to get a bootable image back to the customer.
So if there is anyone out there running “obsolete” PC’s or Macs, then you know were to come to get the best outcome.
This OWC external enclosure is a common sight on the desks of Mac users with big storage needs. It’s a pretty standard 4-bay box, styled somewhat like a cousin of a PowerMac G5 or 1st generation Mac Pro. Inside are the usual options of RAID 0 to RAID 5 with a few additions like JBOD & RAID 10 thrown in for good measure. There are a few variations of this device but the back panels commonly have USB, Firewire, and eSATA ports for direct connection to a PC or Mac. There is no ethernet port on these drives which makes the Qx2 a DAS (Direct Attached Storage) rather than NAS (Network Attached Storage).
Aside from massive name, the OWC Mercury Elite Pro Qx2 also comes with a potentially huge amount of storage. Currently up to 32TB on the OWC store, but also available diskless or BYOD (Bring your own disks). With so much storage space, these drives often become the one and only repository for vast lumps of important data. The benefits of RAID give a false sense of security that the data is safe from drive failures. Unfortunately, there are a number of reasons why the RAID array alone will not protect from certain failures. Most of these failures can be overcome by us in our workshop, but they are not one-button fixes. It is helpful to understand why a seemingly rock-solid platform can be even more risky than a simple external USB drive.
Redundancy
Under common settings, the Qx2 will use RAID 5 for the array. With four 2TB drives this gives you a 6TB volume on a Mac or ~5.5TB on a PC[1], and can cope with a single disk failure. There is a lot of debate about how good RAID 5 really is for such large drives[2]. In our example this means that if a single disk fails, it will need to be replaced, and then the new disk rebuilt with 2TB of data calculated from the other disks. This will take many hours, even under optimal conditions, but if anything goes wrong before it completes the array could stop showing up all together. At this stage, the data is probably recoverable but don’t panic. One wrong move and the data could be gone for good.
If the data is crucial then get assistance from a RAID recovery service now and you should get back all or most of the data.
If any disks are removed or replaced at this point the array could get reinitialised and either make the recovery more complicated or wipe the data completely.
Other Failures
Aside from all the problems with a RAID setup, the volume could also fail in the same ways that a standard hard drive can. There could be deleted files, a reformatted or corrupt partition, or even the RAID controller failure. RAID cannot protect against those types of failure at all.
Recovery
Our first step would be making read-only copies of each disk in the array. This protects against further disks failing, and also allows us to work from copies without risking the original disks. In fact, once the disks are copied, we put the originals to one side and don’t touch them again until all the data is recovered and supplied back to the user.
Once we have our copies, they are loaded into our own hardware where we recreate the RAID in a virtual environment. Again, we don’t use the original hardware, as that may have been the root cause of the problem.
When the virtual RAID has been loaded and all the data extracted, the files are supplied back on whatever alternative storage is suitable, (not the original device!) Once the data has been delivered to the user, and backups made, the old unit can then be destroyed, or returned and reused.
Avoidance
Anyone using RAID on a regular basis should know that RAID is not a replacement for backups. If anything, the increased number of disks makes failure more likely. This needs to be addressed by either making backups to another device, or an online service (preferably both). You ideally want backups that keep historic versions of the files, so that inadvertently deleting a file or changing a file by mistake will not also replace the backup version.
If you are having problems with an OWC Mercury Elite Pro Qx2, give us a call or send a message via the form on this page. We give free advice and could help you avoid permanent data loss.
1. Macs now use 1000 bytes for 1KB but PCs use 1024 bytes.
2. Even RAID 6 does not solve the long time required to rebuild a disk, even though it allows for two disk failures.
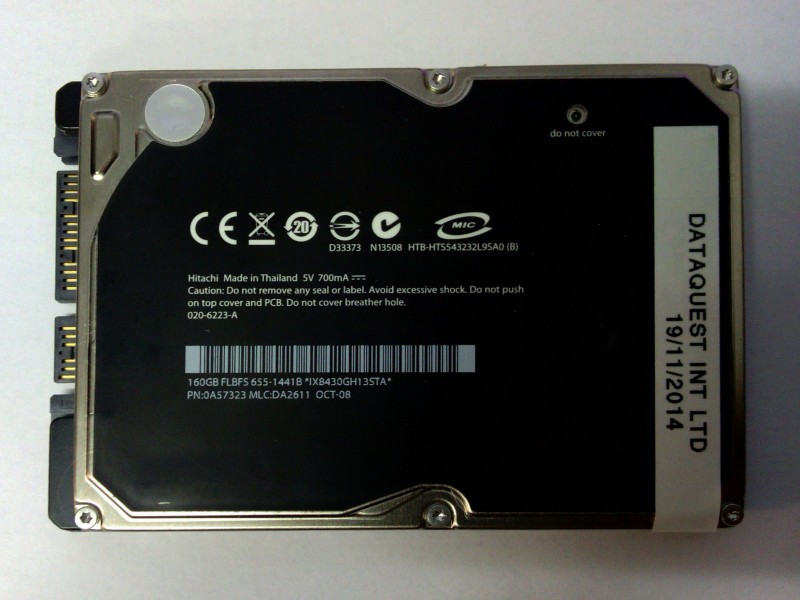
Just recently we received a failed HTS543232L9SA0 from a Macbook Pro. When we carried out the initial diagnosis we noticed that the drive capacity was 160GB and not 320GB as the model number suggests. The Model number should have read HTS543216L9SA0. This particular hard drive has a black label which is different than most Hitachi drive labels of the same type. When we opened the drive in our clean room we found that the drive only had two heads compared to a 320GB which has four. When the drive is attached to our hardware or a PC it identifies correctly as a HTS543216L9SA0.
I had an issue in searching for content within Apple Mail. Every time I tried to search for any particular phrase the Mail application crashed and closed instantly. So I decided to Rebuild the Mailboxes. Before doing this I checked that my latest Time Machine backup had carried out successfully. (It had.)
Once confirmed I clicked Rebuild from the Mailbox drop down menu. Instantly all the mail disappeared and I was left wondering whether it was doing anything. I was patient and waited to see what would happen and sure enough after a couple of minutes all my mail re-appeared intact.
What worried me was that there was no indication that the rebuild was being done. No progress bar or spinning wheel, just an empty window. If I had been impatient I could easily have force quit the rebuild process thinking the application had crashed. That would have resulted in an Apple Mail restore to be sure.
On the Apple Website details are very basic. So, be patient, go for a walk and then come back and see if the rebuild worked.
We’ve been hearing reports of data loss with certain external hard drives after an upgrade to the latest Mac operating system Mavericks. The blame seems to fall to the disk management software that Western Digital bundle with their external hard drives. In response WD has removed WD Drive Manager, WD Raid Manager, and WD SmartWare from their website until they figure out the problem.
We have already had first-hand data recovery enquiries for such disks, so it remains to be seen if these issues can be resolved, or if the data is permanently damaged. One notable case involved a 6TB RAID with two 3TB drives in a mirrored array. After the update to Mavericks, the volume appeared as an empty 3TB drive.
It’s worth noting that even if you use a Western Digital RAID drive set as a mirror, this problem can still cause data loss. Both disks in the mirror are susceptible to the same problem. Remember that RAIDs need to be backed up even more than single disks!
We’ve now completed the recovery process for one of these hard drives. It appears that the drive we received had been formatted to an empty MyBook volume. The way the Mac filesystem stores data means although most of the files can be recovered, it is not possible to restore the original file and folder structure. This causes issues for files like InDesign which link to external files by name when you add graphics to the document.
We’ve not yet seen enough of these disks to know if this is a common outcome for all affected disks.
It’s a common problem that as we generate more data each year we start running out of space to put it. This is now even more of an issue in the smartphone market, where built-in cameras are generating increasingly large photos and videos, without providing much in the way of additional storage. The most common iPhones are still 16 & 32GB but the photos they now produce can be megabytes in size, with videos easily reaching 1GB.
What To Do When You Run Out Of Space
It’s tempting to take that data and put it somewhere else, so either a laptop or external hard drive. Then once you’ve copied it all you delete it from the phone and gain back all that space. Problem solved.
Not So Fast…
If that copy on your laptop is now the only copy, then you could be one spilt coffee from disaster. If the laptop goes up in smoke, gets stolen, dropped or any of the myriad other ways of failing then it’s bye bye data.
The Fix
The key to making backups is redundancy. The key to making backups is redundancy. The key to making backups is redundancy.
You need to make extra copies of your data to different types of storage. This could be an external hard drive, NAS, USB Pen, SD card, anything. But don’t just pick one of those. Make a few backups. Put one in a locked safe somewhere. Send photos off to the cloud. Store a copy of your music at your nan’s house. If any of those copies gets lost or broken you can just replace it with another copy.
So let’s run through an example. All those photos on your iPhone have filled it up. Here’s what I would do:
Copy the photos to my computer. Check them.
Backup the computer as usual. (You’re already doing that, right?)
Make another backup, or copy the photos to an online storage service like Dropbox.
Now it is safe to delete the photos from the iPhone and revel in all that fresh space.
Note: Deleted photo recovery is virtually impossible for all modern iPhone versions due to encryption.
Here’s another example for when your computer runs out of space instead:
Is it possible to upgrade the internal storage? If it is then you should do that.
If this is not possible, or too expensive then you will have to get creative. It will be more fiddly but copy all data to two external hard drives.
You always want to avoid just leaving your data in one place. All electronic devices can (and will) fail, and they have a terrible habit of doing so at the worst possible moment.
So, just remember that no single copy of your files are safe. Making extra copies is cheaper and easier than waiting until something fails.
The other day I got an error message from Time Machine that it wanted to start from scratch with the backups on my Time Capsule. As I only use the Time Capsule as one part of my backup routine that was no big deal. I made sure my other non Time Capsule backups were up to date and then clicked Start New Backup. But what if the Time Capsule had been my only backup? I’d have been running without a backup for as long as Time Machine takes to backup my machine from scratch. Somehow I’ve trimmed my work laptop down to 78GB but it still estimated 6-14 hours until completion. (Yes, over wireless. No, I can’t relocate my office for the day.) What if my laptop died in that time? I’d have a dead laptop, a deleted Time Machine backup and an unfinished Time Machine Backup. In other words I’d be stuffed!
Now don’t get me wrong, I think that Time Machine has been brilliant in getting people making regular backups and I applaud the ease of use. The problem I have is that the language they use in their warnings is not strong enough. People should be more scared of losing their precious family photos or business files. There’s no need to sugar coat it. Also instead of deleting the old backup first, Time Machine should start a new backup and then delete the old one after the new one is verified. As long as there is enough free space of course. In my case there was plenty of free space.
I have included the original warning text below, along with my own version. I’ve not gone totally overboard, and sure it could use some work, but little details like this could really costs somebody some important data. It’s worth spending some time on.
Original Message Text
Transcript: Time Machine completed a verification of your backups on “Time Capsule”. To improve reliability, Time Machine must create a new backup for you.
Click Start New Backup to create a new backup. This will remove your existing backup history. This could take several hours.
Click Back Up Later to be reminded tomorrow. Time Machine won’t perform backups during this time.
My Version
Time Machine must create new backup for you. Fixed
Transcript: Time Machine has found a problem with your backups on “Time Capsule”. First backup any important files, then click Start New Backup. This will create a new backup and then delete the old one. This could take several hours and you will be at risk of data loss until it completes.
Click Back Up Later to be reminded tomorrow. Time Machine won’t perform backups during this time.
Notes
There are a few interesting things to point out here. As you are starting from scratch with the backup, you lose any old versions of files that Time Capsule had stored. It’s bad practice but some people will happily delete files from their computer, safe in the knowledge that Time Capsule has a copy. In that scenario, deleting the backup would be a disaster!
I still don’t know exactly what caused the problem with my Time Capsule backup, but since starting again I haven’t seen that message.