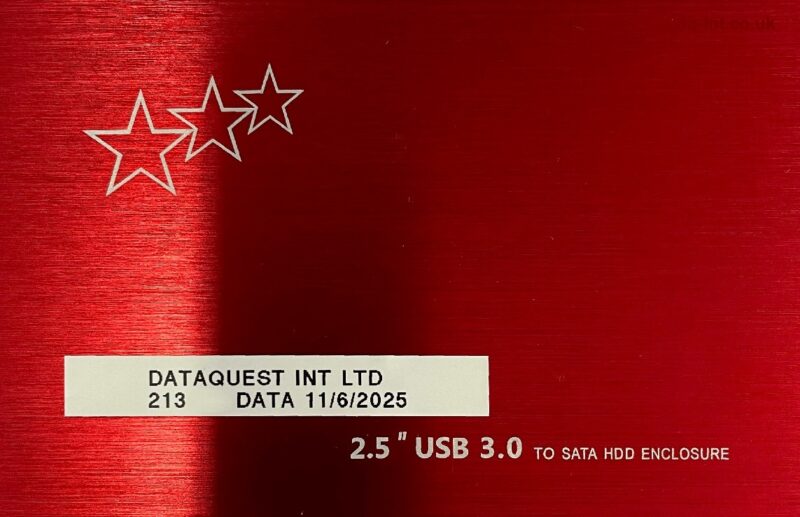
There are an awful lot of fakestoragedrivesavailable to buy online. These are not just cheap or low quality devices, but they are actively designed to trick you. They are fakes. Scams.
We just had another one sent to us to store customer data, so here’s our latest public announcement post.
Looks legit?
Cheap 4TB SSD (or is it?)
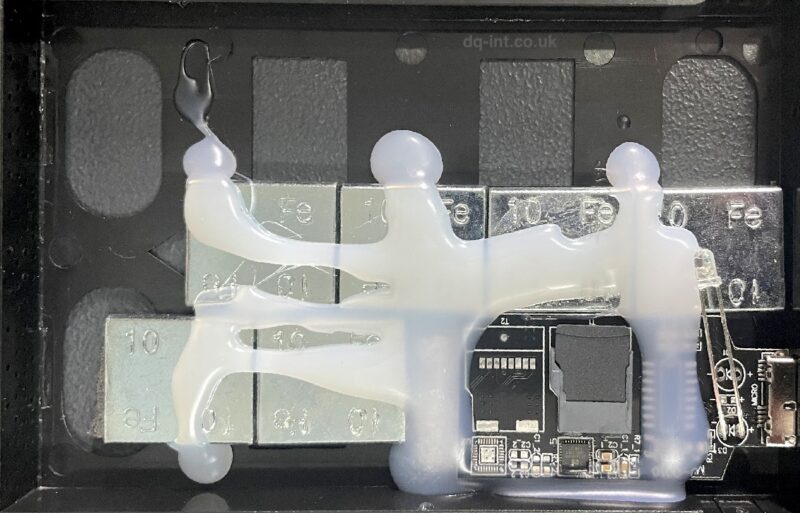
Not only do the fakes appear to be normal at first glance, they are hacked to appear as the advertised capacity to your computer. They come in all shapes and sizes to mimic real devices. And we just can’t resist opening them up to see what’s inside. This most recent one had an unbranded 58GB (!?) SD card hot-glued to a USB adapter board, and a bunch of wheel balancing weights stuck inside to give the illusion of a heftier item. These are not accidentally bad, they’re straight up scams.
Inside a fake 4TB SSD. Yes, those are weights used to balance car wheels!
Behind the mask 🎭
The worst thing about a 58GB SD card masquerading as a 4TB drive, is that the first 50GB of data you store on it will probably seem OK. The speed will be terrible compared to a real SSD, but you may not notice that. As you approach the limit of the storage, data is just discarded instead of being written, so you’d better hope your data exists somewhere else. If not, you’ve just sent it straight through a digital vaporiser. Also, that will usually cause the original 50GB of data to become corrupt, so it’s now all gone. In some cases the original 50GB may be recoverable, but the rest is definitely not. Instead of storage capacity you’ve got lumps of iron.
Thou shalt not judge a book by its cover Thou shalt not judge Lethal Weapon by Danny Glover Thou shalt not judge an external disk by its shiny aluminium cover
Remember the old adage “if it’s too good to be true then it probably is.”
Wheel balancing weights are not a good substitute for data storage media
Since we started offering our specialist data recovery services back in 1998 (😱) storage device capacity and speed has increased almost exponentially. New disks at the time were 6-30GB, but many disks we saw were much older and lower capacity. Now it’s common to see 8TB+ disks and even 100TB. Also physical storage device size has reduced to a mere 2.5″ form factor for a 100TB SSD or 6TB mechanical hard drive, and even smaller for “blade” SSD’s.
Blade SSD
Keeping up with changing technology is crucial in being able to offer data recovery for the latest storage devices.
We do still see vintage storage come in for data recovery. From floppy disks, CDR and DVD+/-Rs, as well as removable cartridge media of all types, and of course old hard drives. So we need to keep old technology knowledge and hardware to support these old devices.
We’ve seen many trends come and go during our time:
External drives with soldered USB-interfaces instead of removable bridge boards (which are now the norm).
External RAID drives, required when disk capacities weren’t growing fast enough.
The move from spinning disks to Solid State Drives
Storage chips soldered directly to motherboards instead of discrete removable drives.
Data stored on phones!
We’ll see if the trend towards AI starts affecting storage drives too.
In the previous part of this series, I explained why small files take longer to copy than large ones. This can make for unpredictable results when you copy a mixed batch of files. I decided to track the time estimates for such a copy and see how wrong the time estimates really are.
Let’s kick off with another animation. I took a series of screenshots when copying files to another disk. I then tracked the estimated time to complete vs the actual completion time. I have also included the raw numbers at the bottom of the page.
Why Computers Always Guess the Wrong Copy Time
How wrong was the original estimate?
The original time estimate was off by almost two hours! 1:59 to be precise. After 9 minutes, the estimate was off by an hour. After around 50 minutes copying, the estimate was only off by 1 minute.
We can’t really use this data to extrapolate much, as it is specific to the data being copied. You’ll notice that the data toward the end of the copy was mostly media files. What the data does show quite clearly is that you cannot trust the time estimates.
General Guide
Large media files – Fast copy, Accurate time estimate
Small office / text files – Slow copy, Accurate time estimate
Mixed data – Mixed copy time, Inaccurate time estimate
Remaining
Estimated Finish
Actual Finish
Wrongness
03:45:00
17:16:00
15:17:00
01:59:00
02:35:00
16:15:00
00:58:00
01:00:00
15:18:00
00:01:00
00:40:00
15:17:00
00:00:00
00:04:00
15:17:00
00:00:00
This is the second post in a mini-series about copying files.
Have you ever noticed that it takes longer to copy 200MB of small text files than it does to copy a 200MB video file. This can seem a bit strange, but there is a simple reason for it.
Metadata
Every time you copy a file, the system must also copy over some metadata. Things like the filename, creation date, modification date, filesize etc. When you copy a large file like a video, this information is copied once, and then all the data blocks are copied into place. With tiny text files, new metadata needs to be transferred for each and every file.
In real-world examples, I’ve seen disks capabale of copying at 100MB/s get as low as 1MB/s when copying small files.
This is easier to see in simple animations. In the images below, the metadata is represented by the blue container and red block. The data blocks are shown in green.
Copy Large Video Files
Copy Tiny Text Files
This behaviour also leads to one of the most annoying things about copying files. The crazy time estimates! If you copy a mix of large and small files, the computer can’t figure out how long the copy will take, so just adjusts the estimate as it goes along.
This post assumes you’re copying the files in ideal conditions. In the real world you also need to account for slow networks, slow connections, failing disks and countless other things that can slow down a transfer.
This is the first post in a mini-series about copying files.
I have a particularly nerdy Apple rabbit hole to share with you today involving the labels on Apple hard drives. At some point around 2007-2008 Apple started re-labelling the hard drives used in their computers. I’m pretty sure the hard drives in black & white MacBooks were standard white labels with an Apple part number (655-XXXX) printed on them. Now disks feature a black label with white text. Not particularly exciting, but maybe somebody (Jony?) wanted the disks to match the fancy black circuit boards now used in all Apple hardware. That’s the sort of attention to detail we’ve come to love from Apple devices. Whatever the reason, this has resulted in a batch of Toshiba drives in circulation with incorrect information printed on them. I assume these are the result of a simple ⌘+C, ⌘+V error. My speculation is that after printing the labels for the 320GB disk nobody remembered to change the text for the 160GB version.
For reference MK3253GSX is 320GB and MK1653GSX is 160GB. In Apple’s world, both disks use MK3253GSX on the label, even though the correct number is shown when you check Disk Utility or About This Mac > System Information.
This wonky number business all came to a head ? when we were looking for replacement parts for one of these disks. We needed the double headed 160GB drive, not the four headed 320GB.
Mislabelled Apple Hard Drives MK3253GSX MK1653GSX
When I was trying to research this, I was quite suprised to find an old blog post of ours that shows the same problem with Hitachi drives manufactured around the same time. I’ve not found any other mention of this labelling fault, so thought I’d post it up here for future Mac Archaeologists to find.
Despite some amount of publicity, the problem of fake capacity flash drives being sold online has still not gone away. Recently we did a bit of consumer investigation and bought a few to test. Surely after two or three years eBay will have sorted this problem out?
What Are Fake Capacity Flash Drives?
If you’ve not heard of these before, a fake capacity flash drive is simply a small low capacity flash drive pretending to have (much) more storage. The clever / devious part is that they may have only 16GB of real storage, but can appear to the computer as anything up to 2TB. You will be able to copy data to the device, but only the first 16GB may be readable later. Some devices constantly overwrite the same 16GB while other just dump the rest of the data into a black hole.
How Do I Know If My USB Drive is Fake?
There are not any strict rules, but you can start to build up a picture as you gather more information.
Price – These flash drives will be WAY cheaper than anything you can buy in a retail store. We just bought 512GB flash drives for £10 and 1TB drives for £15. Currently a 64GB SD card is £32.48 at Novatech, so you can see how expensive real flash drives should be.
Quality – Large capacity USB drives are relatively expensive. You’d expect them to be well made and probably well packaged. The fake drives usually come unbranded, in generic clear bags.
Wording – Since these problems have been reported, some sellers are putting some disclaimers on the listings to suggest you should only use the devices for small amounts of data etc. This is obviously nonsense. If you buy a real 1TB of storage, you can use all 1TB.
Testing – Although most people won’t be familiar with testing hardware, there are some pretty simple tools to test USB drives. They write patterns of data to the chosen device and then read it back again to make sure it was written correctly. (I won’t provide a link as it would destroy any chance of recovery if used incorrectly!)
What To Do If You Have A Fake Capacity Flash Drive
Most online marketplaces like eBay have pretty robust buyer protection to allow you to claim a refund. The advice for making claims varies with each website so you may need to hunt around, or contact the site directly. Although eBay are more than happy to organise refunds, they show little interest in stopping the sale of these devices. We’ve spoken to eBay customer services a number of times and they said that their system will flag up if enough people make returns.
You Often Don’t Know Until It’s Too Late
It’s a bad idea to keep using one of these USBs. If you detect a fake capacity, you may think it’s OK to just use it for small amounts of data but it’s not a good idea. The problem is that as you use and delete files, you could gradually start edging towards the limit of the storage. The next file you write could just go into the black hole, and the data is lost. In fact, many people don’t realise their flash drive is a fake until they exceed the “genuine” part of the storage. If you were copying photographs to the USB drive, you might not notice that some of them are missing until you try to read them again much later.
Not Just Memory Sticks
These same types of fake flash drives also appear as SD cards so we’ve heard from people that were at weddings or on their honeymoon and lost all or most of the photos.
Update 31-10-2016: Since posting this, we were made aware of this report from the USA about eBay’s problem with fake flash storage.
This OWC external enclosure is a common sight on the desks of Mac users with big storage needs. It’s a pretty standard 4-bay box, styled somewhat like a cousin of a PowerMac G5 or 1st generation Mac Pro. Inside are the usual options of RAID 0 to RAID 5 with a few additions like JBOD & RAID 10 thrown in for good measure. There are a few variations of this device but the back panels commonly have USB, Firewire, and eSATA ports for direct connection to a PC or Mac. There is no ethernet port on these drives which makes the Qx2 a DAS (Direct Attached Storage) rather than NAS (Network Attached Storage).
Aside from massive name, the OWC Mercury Elite Pro Qx2 also comes with a potentially huge amount of storage. Currently up to 32TB on the OWC store, but also available diskless or BYOD (Bring your own disks). With so much storage space, these drives often become the one and only repository for vast lumps of important data. The benefits of RAID give a false sense of security that the data is safe from drive failures. Unfortunately, there are a number of reasons why the RAID array alone will not protect from certain failures. Most of these failures can be overcome by us in our workshop, but they are not one-button fixes. It is helpful to understand why a seemingly rock-solid platform can be even more risky than a simple external USB drive.
Redundancy
Under common settings, the Qx2 will use RAID 5 for the array. With four 2TB drives this gives you a 6TB volume on a Mac or ~5.5TB on a PC[1], and can cope with a single disk failure. There is a lot of debate about how good RAID 5 really is for such large drives[2]. In our example this means that if a single disk fails, it will need to be replaced, and then the new disk rebuilt with 2TB of data calculated from the other disks. This will take many hours, even under optimal conditions, but if anything goes wrong before it completes the array could stop showing up all together. At this stage, the data is probably recoverable but don’t panic. One wrong move and the data could be gone for good.
If the data is crucial then get assistance from a RAID recovery service now and you should get back all or most of the data.
If any disks are removed or replaced at this point the array could get reinitialised and either make the recovery more complicated or wipe the data completely.
Other Failures
Aside from all the problems with a RAID setup, the volume could also fail in the same ways that a standard hard drive can. There could be deleted files, a reformatted or corrupt partition, or even the RAID controller failure. RAID cannot protect against those types of failure at all.
Recovery
Our first step would be making read-only copies of each disk in the array. This protects against further disks failing, and also allows us to work from copies without risking the original disks. In fact, once the disks are copied, we put the originals to one side and don’t touch them again until all the data is recovered and supplied back to the user.
Once we have our copies, they are loaded into our own hardware where we recreate the RAID in a virtual environment. Again, we don’t use the original hardware, as that may have been the root cause of the problem.
When the virtual RAID has been loaded and all the data extracted, the files are supplied back on whatever alternative storage is suitable, (not the original device!) Once the data has been delivered to the user, and backups made, the old unit can then be destroyed, or returned and reused.
Avoidance
Anyone using RAID on a regular basis should know that RAID is not a replacement for backups. If anything, the increased number of disks makes failure more likely. This needs to be addressed by either making backups to another device, or an online service (preferably both). You ideally want backups that keep historic versions of the files, so that inadvertently deleting a file or changing a file by mistake will not also replace the backup version.
If you are having problems with an OWC Mercury Elite Pro Qx2, give us a call or send a message via the form on this page. We give free advice and could help you avoid permanent data loss.
1. Macs now use 1000 bytes for 1KB but PCs use 1024 bytes.
2. Even RAID 6 does not solve the long time required to rebuild a disk, even though it allows for two disk failures.
It’s a common problem that as we generate more data each year we start running out of space to put it. This is now even more of an issue in the smartphone market, where built-in cameras are generating increasingly large photos and videos, without providing much in the way of additional storage. The most common iPhones are still 16 & 32GB but the photos they now produce can be megabytes in size, with videos easily reaching 1GB.
What To Do When You Run Out Of Space
It’s tempting to take that data and put it somewhere else, so either a laptop or external hard drive. Then once you’ve copied it all you delete it from the phone and gain back all that space. Problem solved.
Not So Fast…
If that copy on your laptop is now the only copy, then you could be one spilt coffee from disaster. If the laptop goes up in smoke, gets stolen, dropped or any of the myriad other ways of failing then it’s bye bye data.
The Fix
The key to making backups is redundancy. The key to making backups is redundancy. The key to making backups is redundancy.
You need to make extra copies of your data to different types of storage. This could be an external hard drive, NAS, USB Pen, SD card, anything. But don’t just pick one of those. Make a few backups. Put one in a locked safe somewhere. Send photos off to the cloud. Store a copy of your music at your nan’s house. If any of those copies gets lost or broken you can just replace it with another copy.
So let’s run through an example. All those photos on your iPhone have filled it up. Here’s what I would do:
Copy the photos to my computer. Check them.
Backup the computer as usual. (You’re already doing that, right?)
Make another backup, or copy the photos to an online storage service like Dropbox.
Now it is safe to delete the photos from the iPhone and revel in all that fresh space.
Note: Deleted photo recovery is virtually impossible for all modern iPhone versions due to encryption.
Here’s another example for when your computer runs out of space instead:
Is it possible to upgrade the internal storage? If it is then you should do that.
If this is not possible, or too expensive then you will have to get creative. It will be more fiddly but copy all data to two external hard drives.
You always want to avoid just leaving your data in one place. All electronic devices can (and will) fail, and they have a terrible habit of doing so at the worst possible moment.
So, just remember that no single copy of your files are safe. Making extra copies is cheaper and easier than waiting until something fails.
When we recover iPhones, although we can usually provide the data in a computer-readable format, it is often easier to just load the data back onto another iPhone. Fortunately, as long as you restore the data in the correct order, you should get your iPhone up and running with your restored data.
Preparation
Before you attach the iPhone you need to make sure iTunes is ready for it. You need to put the recovered iPhone backup into the correct place for iTunes to find. Quit iTunes first.
The iPhone backups go into:
C:\Documents and Settings\username\Application Data\Apple Computer\Mobile Sync\Backup
Now copy your iPhone backup folder from the recovered data to the backup folder on the computer. If you’ve ever made any iPhone backups they will be in this folder with long unreadable names of random numbers and letters. It doesn’t matter that you can’t read it, iTunes can. Don’t rename it!
So now your /MobileSync/Backup folder should look something like:
iPhone Backup Folder
Remember that the string of numbers will not be the same.
Next you can launch iTunes and see if the iPhone backup is seen in the list. Within iTunes select Preferences and then the Devices tab (Image Below). If your backup file has been recognised then you should see the iPhone name in the list and the date of the backup. If not, go back and check that everything is in the right place.
iPhone Backup Preferences
Sign In
Next, it’s a good idea to sign in to the iTunes Store. If you’ve not used this computer with this iPhone before you may also need to authorise the computer to access your purchased apps and media. Once signed-in to the store you should choose the Store menu and select “Authorise This Computer…” Be aware that you can only authorise a set number of computers. (The limit can be reset if needed.)
Media
Now you can import the Music and apps into iTunes. Don’t worry if some of the apps don’t have icons yet.
Lets Go
Once all that is finished you are ready to connect the new iPhone. You will need to follow some on-screen prompts and settings, and then it will ask if you want to set it up as a new device, or restore it from a backup. This is where all that hard work pays off. Choose the backup, and let iTunes work its magic. It can take a while if you have lots to restore but when it’s finished your phone should boot into a familiar screen. Your Contacts, Messages, Calendars, Notes and lots of other data will be back in their respective apps.
If none of the other apps got transferred you can choose the Apps tab within iTunes and tick “Sync Apps.” You can then tick whichever apps you want to send to the iPhone.
Like most external hard drives, Buffalo external drives are simply a wrapper around a regular hard drive. Aside from the protective shell they also have some electronic parts to convert between the internal hard drive and the external USB, Firewire, eSATA or Thunderbolt connections.
If you have problems with an external drive, you can perform a relatively simple test to check where the fault lies. Be aware that opening the external drive case will probably void your warranty, and if there is crucial data on the drive you should seek professional data recovery. That’s the obligatory warning out the way, so lets have a look at some troubleshooting.
Troubleshooting tips.
First check all cables are plugged in securely, and not damaged or frayed near the ends.. If you have an identical drive with spare cables try them, but make sure you don’t plug in a power supply with different voltage! Hard drives don’t handle extra voltage well so you’ll end up in a worse position than you started.
If you know how, you could remove the hard drive from the external case and attach it directly to a PC to see if that allows access to the data. If it does, you should copy the data off straight away. The drive could still be faulty & fail again soon.
Whatever you do, don’t dismantle the actual hard drive. Hard drives are built in controlled clean-air environments and even the smallest spec of dust can cause permanent damage to the drive.
Since the introduction of unique ROM chips on the hard drives, it is often no longer possible to exchange circuit boards with another hard drive to access the data. In our experience circuit board problems are far less common than they used to be.
If you are looking for a data recovery service for your external hard drive then have a look at our external drive recovery services.