Category: Guide

Tutorials, How-Tos, or Guides.  This collection of posts will show you how to do something useful.

  • Why Your Free Gmail Account Could Disappear Forever (and What You Can Do)

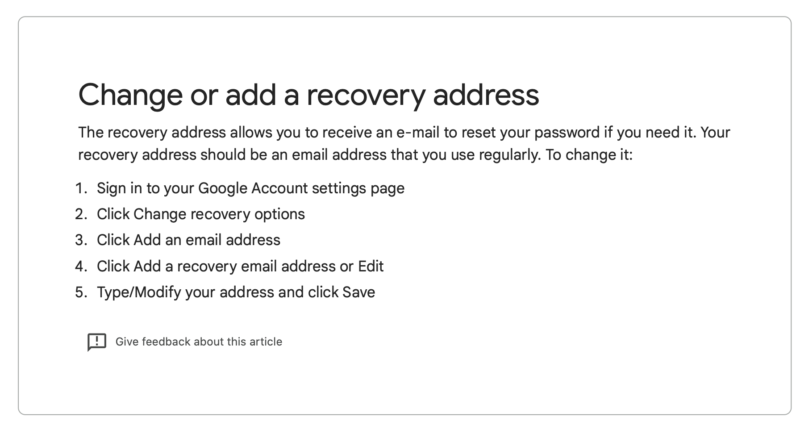
    Using a free Gmail account? You might not realize it could vanish without warning — and it may not even be your fault.

    Here’s the catch: If someone tries to log in and gets your password wrong too many times, your account gets locked.

    No big deal, right? Well, only if you’ve added a backup recovery email. If you haven’t, you’re stuck. There’s no way to unlock it, and free accounts don’t get any support from Google. That’s right — no one can help you, not even Google itself!

    Time to check your recovery settings!

  • Kimsnot Extreme PRO – Fake 128GB SD Card

    Photo of a fake SD card
    Fake Capacity SD Card

    I assume this Kimsnot card is meant to be a fake Kingston SD card, although it appears to steal more of the visual design from a SanDisk Extreme card. This SD card was sadly used to photograph a wedding, and unsurprisingly to us, only the first 16GB of photographs are readable. The rest are lost forever, because the other 112GB just doesn’t exist. The card reports 128GB of useable space, but anything above 16GB gets written into thin air. You don’t even get an error until you try to read back the files later. We’ve seen all sorts of fake capacity storage, and despite clearing them out every once in a while, Amazon and eBay are back selling them again. And just in time for all the new cameras, phones, and computers people will be getting for Christmas!

    See our previous post about these fakes in 2016!

    How to Spot Fakes

    1. Fakes are usually sponsored listings, so look for the sponsored tag.
    2. Fakes are usually cheaper than everything else, but not always
    3. Fakes can be brands you’ve never heard of. Making storage devices is expensive business, so you’ve probably heard of the genuine companies.
    4. Spelling or specification mistakes.
    5. Buy from trusted sellers only. You’re less likely to buy a fake card from Argos, John Lewis, Currys, or even a supermarket!
    6. The fakes usually work to a point, but with worse performance, and not to the full capacity. Try to fully test the device across the whole storage before you trust it. Fakes commonly have 32GB or less real storage, so make sure to test writing & reading above that size.

    How bad is it?

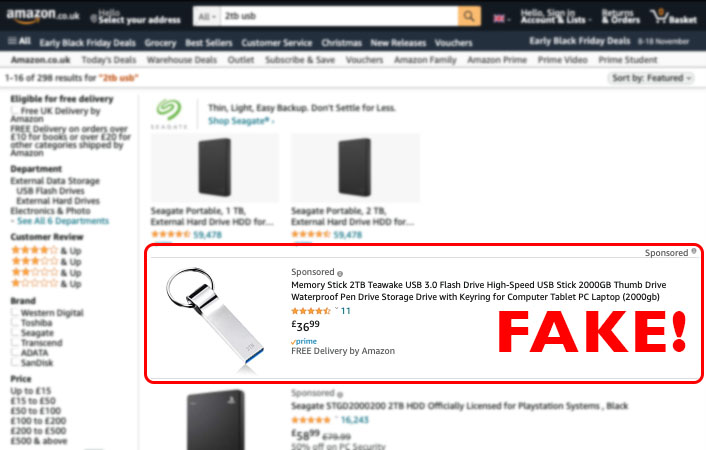
    I’ve just this second run a few searches, and get fake products as the first result. In the case of ebay, it’s the top result of 1,522, and appears directly above a genuine hard drive.

    eBay Fake 1TB Portable Drives
    Amazon Fake 2TB USB Drives
  • File List Support

    We’ve started to use an open source file listing tool, to make it easier to check though the recovered data before we send it to you.

    We’ll send you a zipped html file, with your job number as the filename. Something like “211111-File-List.zip“. Inside is a similarly named file ending “.html” which is a web page and can be opened by a web browser on a computer.

    You should see your folders listed on the left, and can click to navigate though the subfolders. A picture paints a thousand words, so see the example below.

    Image of a visual file list

    FAQ

    Why can’t I open the files?

    This is just a visual list of the files, it doesn’t actually contain any files.

    The file is stuck at “Loading…”

    iPhones don’t easily allow you to open the html file so you should open it on a PC or Mac if possible. We’re working on a solution for this at the moment.

    There are missing files

    If you can’t find specific files, there is a search tool at the top. If that still fails to show your files, let us know. Maybe the listing process has missed some files, or maybe we have other recovery options available.

    There are extra files I don’t recognise

    The recovery process can sometimes unearth hidden, deleted, or duplicated files. You can usually ignore them, and we usually filter out as much junk as we can.

    Any other questions?

    Get in touch, and we’ll help.

    Credit to RL Vision for their handy tool Snap2HTML, which is the basis for this feature.

  • Free & Cheap Backup for iPhone, iPad, Android, PC & Macs

    If you’ve survived without backups and not lost data, you’ve been lucky so far. But why push your luck? There are a bunch of free & cheap ways to backup that could save you from the pain of losing data. Even better, you could help out your family, and give a gift that almost nobody will thank you for. At least until they drop their phone down the toilet. Then you’ll be hailed a total hero!

    What is a Backup?

    First, I have to get this out of the way. A backup is an extra copy of the files. If you don’t have two or more copies of something in different places, it’s not a backup. A common mistake is buying an external “backup” drive, and then filling it up with data that you don’t have anywhere else. All that does is move the problem from one disk to another. If the “backup” drive fails you’ll still need to get it recovered professionally (👋). If you had another disk with the same files on, you’d be fine. It might sound wasteful to keep multiple copies of your files, but it is the only safe way. Even the most reliable disks have a 1% failure rate. If you made a backup copy of a paper document, you wouldn’t shred the original, so just think like that.

    What is a Cloud? ☁️

    A cloud is just a server somewhere. Modern cloud services are just huge networks of servers that can store your data.

    iPhones & iPads

    iCloud

    If you’re an iPhone or iPad user, you can’t beat iCloud for convenience. With an iCloud backup, you can load a replacement iPhone or iPad with your data, and carry on where you left off. It might seem unfair that Apple will sell you a phone for £1,099 and then want an extra £0.79 per month for iCloud, but once you get past that, it really is worth every penny. For under £10 per year, you’ll be mad to not sign up.

    Family Sharing

    If you have multiple iPhones & iPads in your household, you can also share iCloud storage using Family Sharing. That way, you can buy one of the larger storage plans and backup all the iDevices in your house. All the data is still kept privately for each person in iCloud, but the total storage is shared. This will also give you some other useful features like shared family calendars, notes & reminders.

    Google Photos

    Google photos works across pretty much any device. It doesn’t matter if you run it from your iPhone, Android Tablet, a PC, whatever. The free version only has a fairly small allowance (currently 15GB), but you can then pay extra for more storage as you need it. (£24.99 per year for 200GB in 2023)

    Android Phones & Tablets

    Google One. That’s the Google equivalent of iCloud and has tools to backup devices, and photos. (See above.)

    Mac & PC

    Regardless of what PC or Mac you have, you can’t beat an external hard drive for value. As long as your internal disk is big enough to fit all your files, you can then use an external drive to keep an extra copy of everything. If your internal disk is too small, the best option is to upgrade it, and then also keep an external backup drive. If you don’t (or can’t) upgrade the internal disk, you’ll need to juggle data and backups around external disks. This increases your risk of missing something.

    Computers can also use cloud storage, so if you already use one on your phone, it’s worth seeing what you can share with your PC or Mac.

    iCloud on your Mac will let you sync photos and documents but doesn’t allow you to backup and restore to the cloud the way it does with iPhones. If you use iCloud on a Mac, I’d still recommend an external drive.

    Attach an external drive to a Mac, and it will offer to use it as a backup with Time Machine. ⚠️ Be aware that it will erase the disk first! Time Machine will take a copy of your whole Mac, and keep it up to date. Even if you only plug the disk in once a month, Time Machine will catch up with any new files and copy them over automatically. If your Mac dies, you can use the backup drive to load the data to a repaired or replaced Mac.

    Windows 10/11 has a backup feature named “File History.” Much like Time Machine, you can select an external disk for backups, and then file history will keep track of file changes automatically. Unlike the Mac, File History doesn’t backup software and settings, so you’d need to get things setup another way first before you load the files back.

    Conclusion

    Do yourself a favour and get your files backed up. Remember, you don’t need to backup everything, just the things you don’t want to lose 😜!

  • Deleted Android Data

    As with the new iPhones your new Android when data such as photos and contacts are deleted, in most cases due to encryption your data is lost forever.

    One of the ways deleted data can be retrieved is by actually skipping the phone itself and heading for backups. Many phones automatically back up to the user’s computer or to the cloud. It can be easier to extract the data from the backup than the phone. Obviously the level of success depends on how recently the phone was backed up and the service used to store the files.

  • Add Another Time Machine Disk

    If you need to add or change your Time Machine™️ backup drive, the process is pretty simple. Plug in a new disk and make sure there is nothing on it that you need. In most cases Time Machine will ERASE the disk before using it! You have been warned.

    Now might be a good time to find the disk on your desktop and rename it to something obvious like “backups” for example.

    Next, open Time Machine Preferences from the Time Machine menu. If you don’t have the Time Machine icon near the clock, you can also find the settings within “System Preferences”.

    Open Time Machine Preferences
    Open Time Machine Preferences

    Click Add Or Remove Backup Disk
    Click Add Or Remove Backup Disk

    Select the New Disk
    Select the New Disk

    Click the “Use Disk” button, and Time Machine will start making a new full backup to this new disk. This may take a few hours.

  • Backup Your Data. It’s Not As Tough As You Think

    Backup Your Data. It’s Not As Tough As You Think

    According to the latest Backblaze survey, 21% of people have never made a backup of their files. The figures show a gradual increase in backups since 2008, but there’s still at least one in five people 🙋‍♂️🤦‍♂️🤦‍♂️🤦‍♂️🤦‍♂️ that are risking total data loss. And more than half of the people surveyed had no recent backup.

    Fortunately technology has changed a lot in the last few years. There are a whole host of  companies that offer free cloud storage. Large capacity, fast, and cheap external disks have also made backups at home easier. Software improvements in macOS and Windows have made backups automatic, so there’s really no excuse these days. Don’t wait until it’s too late!

    A Quick Guide To Making Backups ?

    Identify the files you can’t live without. These might be a few spreadsheets, some word documents, your thesis, anything irreplaceable. These are the files you’d grab if there was a fire. Forget photos for now as I’ve tackled them separately below ⬇️. If these files are small text or office documents, use something like dropbox or google drive to keep them synchronised in the cloud. An added bonus is this data will also be available on your other devices like iPads, iPhones or other computers. These cloud hosts give away a small amount of storage for free, so you might as well use it!

    Photos deserve a bit of special attention here. Photos and videos are often the largest files for home-users, and will usually be well over the limits of free cloud storage. Fortunately both Apple’s iCloud and Google Photos can take care of them. Google Photos will take an unlimited number of photo uploads but limits the size of single files. The size limits are fair for most home users, especially if you just use a smartphone and not a fancy camera. Although not free, the price for extra iCloud storage is pretty reasonable too – £0.79 per month for 50GB at time of writing. If you are an iPhone user, the iCloud option has other benefits like device backups, data sharing with Macs, iCloud Keychain etc.

    Once you have one of these options set up, it’s a good idea to keep an eye on it for a while and make sure the files are being copied over. You can login to all of these services from a computer and have a look at the files stored on there.

    The Whole Hog™ Whole Hog

    Now you’ve sorted the important stuff, It’s probably worth going the whole hog and also making a local backup. Don’t worry, it’s not difficult, and once you’ve set it up, you hardly have to think about it again.

    Mac Users ?

    If you plug in a new hard drive, macOS will ask if you want to use it with Time Machine. BEWARE that this will usually ERASE the disk and DELETE any data that’s on it! If that’s what you’re trying to do, click YES! Time Machine will then make a backup of your whole Mac. The first backup can take hours to finish so try to leave the computer on until it’s done. Once it’s finished, Time Machine will make regular backups as long as the disk is plugged in. These smaller backups just copy over new changes so don’t take as long.

    Recent versions of Time Machine will happily make backups to multiple disks if you have them. You could keep another one in a safe or at work, and bring it back periodically to update itself. Time Machine will figure out where it left off, and fill in the gaps.

    If your Internal disk ever fails, you can use the Time Machine backups to restore everything, including Applications and settings. You can also recover single files at any point if you ever need to.

    Windows Users ?

    Windows 10 has an automatic backup process too. It’s a little buried inside the settings, but once it’s set you can (pretty much) forget about it. I find the fastest way is to click the “Start Orb” and type “backup” into the search box. You want to choose “Back up with File History”. This should take you into the File History page inside Settings. Click “Add a drive” and select your external drive. Windows will now keep extra copies of your data files on that disk. The default options will backup things like Photos and Documents, as long as you store them in the standard Windows folders (which you should always do anyway!).

    File history will only save your data files, so if the computer fails, you’ll need to get it up and running again before you can load the files back on. It’s worth checking if you have the original disks, or even seeing if you can create rescue disks. (It depends on your system). The “Backup & Restore (Windows 7)” program allows for a full system backup, but in my experience, this process is much more prone to errors, and also takes a long time to complete the backups.

  • Easter Backup Tips

    Easter Backup Tips

    The long weekend is only hours away, so if you’ve got a few spare minutes over Easter, why not get your data in order & sort out some backups. Save yourself the dread of losing all your documents or photos, and then sit back and eat some chocolate eggs!

    Simple Start

    First, when people talk about backups, they actually mean just make copies of your files. It sounds obvious, but this is often misunderstood. If you have a few really important files, you can make a backup of them by copying them somewhere else. That could be a memory stick, SD card, CD, DVD, Dropbox, whatever. The important thing is when you’ve copied the file, do not delete the original. For a backup to be useful, it must be a copy of some data.

    The Plan

    If you want to take things a step further, you probably want a way to automate the backup process. That way, your computer keeps track of new & updated files, and you don’t need to think too much about it.

    Step 1

    You ideally want to have enough space in your main computer to hold all your important data. This may mean investing in a larger hard drive or SSD, but is by far the easiest way to stay safe. Now whenever you use the computer, you always store the files on the large internal disk. This means any backups you make can simply be copies of this main disk.

    To sidetrack slightly, imagine if you instead stored photos on one external disk, documents on your laptop, and movies on another disk. This would be a nightmare to keep backed up, as you would constantly need to attach and reattach different disks.

    Step 2

    Now all your data is stored on the main disk inside your computer, backups are simple. On a Mac, point Time Machine at an external disk. On a PC, point Windows Backup (File History) to your external disk. Both will create a copy of your main disk, and then take care of scheduling future copies to keep you up to date.

    Never store files directly onto the external disk, as they won’t be backed up anywhere else if the disk fails. Now, when you make new files on your computer they will eventually get backed up to your external disk too. Just remember to either keep it plugged in, or plug it in regularly to catch up.

    Step 3

    Once you have a single backup sorted, you might think of a few ways you could still end up losing data. For example, if the external disk is always plugged in, any electrical spike through the power lines could kill off both disks in one go. It does happen, even if you have a surge protector! Also, what if there was a fire or flood. Both disks side by side could get damaged. Then there is also the risk of the computer and all the surrounding equipment being stolen.

    Luckily, there are also ways to protect yourself here too. A simple way would be to use another external disk to make a backup, but then unplug it and store it in a safe somewhere. It could be in a friend’s house, or at work, or anywhere really. Ideally not in the same building as the other disks, to cut down the chances of all disks being lost at once.

    There is another way to avoid the worry of storing another disk outside your house. Online backup. Sometimes known as cloud backup, online backups give you storage on a server somewhere, and a small program on your computer to send the data over. We’ve heard great things about Backblaze for online backups. Their ex-Apple engineers have created a really simple service, that’s super cheap with unlimited storage.

    Done

    So now, with your backup disk humming away on your desk, and your files beaming over to a Backblaze server online, you can relax and stop worrying about losing all your files.

    If you’re reading this too late and have already lost data, get in touch and we’ll see if there’s any way to get it back.

  • What To Do With A Dropped Hard Drive

    If there is data on the drive that you cannot afford to lose, then do not try to fix the drive yourself. I would also suggest that you do not even try to power it back on after it has been dropped, as this is what usually causes the most damage. Whether your drive is an external desktop drive or a small portable one, they all work in the same way. Broadly speaking the inside of a hard drive is a bit like a record player with a mechanical moving needle reading the vinyl record. I can remember the times when playing old vinyl records, once you got scratches on them they never really worked the same again.

    So I recommend not to panic, decide on what the value of the lost data is to you. Sometimes it may not be money value but a sentimental one. Once you have decided, then carry out some research online and look at data recovery company reviews. From our experience with dropped drives, the amount of work involved in overcoming the problem would not be covered by the low initial cost that some data recovery companies advertise and therefore the cost would soon escalate.

    There is always hope of recovering data from a dropped drive but as you have read, it depends on your actions as to the eventual outcome.

  • Apple Mail Blank Screen on Rebuild in Mavericks

    Apple Mail Blank Screen on Rebuild in Mavericks

    I had an issue in searching for content within Apple Mail. Every time I tried to search for any particular phrase the Mail application crashed and closed instantly. So I decided to Rebuild the Mailboxes. Before doing this I checked that my latest Time Machine backup had carried out successfully. (It had.)

    Once confirmed I clicked Rebuild from the Mailbox drop down menu. Instantly all the mail disappeared and I was left wondering whether it was doing anything. I was patient and waited to see what would happen and sure enough after a couple of minutes all my mail re-appeared intact.

    What worried me was that there was no indication that the rebuild was being done. No progress bar or spinning wheel, just an empty window. If I had been impatient I could easily have force quit the rebuild process thinking the application had crashed. That would have resulted in an Apple Mail restore to be sure.

    On the Apple Website details are very basic. So, be patient, go for a walk and then come back and see if the rebuild worked.